


Orangey Weekend - IMBB #14
24 April 2005
Thanks to Foodgoat for choosing a brilliant theme for this month’s IMBB – I think deciding recipes from a colour is a wonderful idea and I hope this theme is going to be a regular one! As I’m sure everybody else did, I had so many ideas about orangey recipes, but just too little time to try them all out.
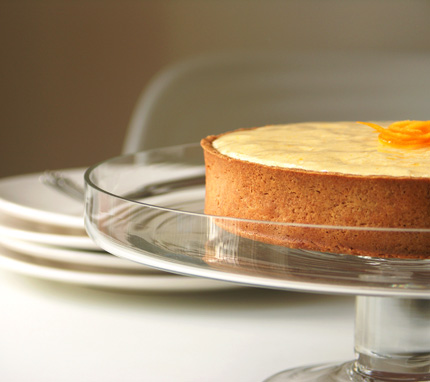
I made an orange & lemon tart using Gordon Ramsay’s recipe earlier last week – although the tart seems to be one of his signature dishes, I have to say that I didn’t find it too impressive… the filling for the tart was basically orange/lemon custard from concentrated orange/lemon juice – that was delicious, I really liked it, but as a tart I thought it somehow lacked richness and the filling didn’t quite seem to work with the crusty base. Still, I liked the idea of caramelising sugar to finish off as it gives a nice texture as well as enhancing the taste, so maybe I can use the idea for something else in the future.
After this minor disappointment, I was going to make something completely different, but because I had made a quite a lot of tart dough in advance, I decided to stick to making a tart this time. I found a lemon tart recipe in Desserts by Pierre Herme, which seemed better than Mr Ramsay’s one in terms of richness of the filling. It has the same ingredients as lemon curd, but cooling the cream significantly before adding the butter gives a lovely silky texture. And the result? That was a winner as I imagined. The tangy yet rich flavour works really well with the almond and vanilla flavoured tart dough. The original recipe for the filling used only lemons, but to get an orangey hue (and taste), I substituted one third of the quantities of lemon juice/zest with orange.
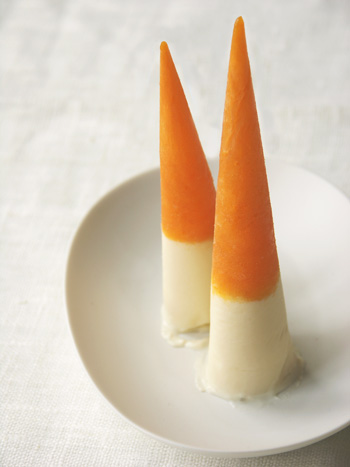
This dessert caught my eye when I was cooling the filling for the tart, it seemed straightforward to make, so I gave it a quick go. I found the recipe in donna hay magazine – it’s a frozen dessert with apricot, honey, greek yoghurt and créme fraiche. Although I could sort of imagine how it was going to taste, it was good fun making cone shapes with baking paper and I think this is the kind of thing you can enjoy making with small children (although I don’t have any!). I liked the texture as well as the taste, although I think that adding less créme fraiche might be better for this combination.
Lemon tart
the crust
1 fully baked 10 1/4-inch 26cm tart shell made from Sweet Tart Dough, cooled to room temperature
Keep the cooled crust, in its ring, on the baking sheet or transfer it to a cardboard cake round (you can make the crust up to 8 hours ahead and keep it in its ring at room temperature).
to assemble
1 1/2 cups Lemon Cream
transparent glaze or lemon jelly or apple jelly
lemon slice, blueberries and/or strawberries, optional
Spoon the lemon cream into the crust and use a long metal offset spatula to smooth the top. If the cream is hot, put the tart in the freezer for half an hour to cool it; if not, proceed with the glazing.
Warm the glaze if necessary, or, if you’re using jelly, heat the jelly in a microwave oven or a small saucepan over low heat until it liquefies. Pour or spoon the glaze evenly over the top of the tart, reserving a little of the glaze if you’d like to finish the tart with a slice of lemon or a small cluster of berries. Brush the fruit with a little hot glaze or jelly to give it a shine. The tart can be chilled until needed or served immediately.
Sweet tart dough
10 ounces unsalted butter, softened
1 1/2 cups confectioner’s sugar, sifted
1/2 cup (lightly packed) ground blanched almonds
1/2 teaspoon salt
1/2 teaspoon vanilla bean pulp or 1/4 teaspoon pure vanilla extract
2 large eggs, at room temperature, lightly beaten
3 1/2 cups all-purpose flour
to make the dough in a mixer
Place the butter in the bowl of a mixer fitted with the paddle attachment and beat on low speed until creamy. Add the sugar, almonds, salt, vanilla and eggs and, still working on low speed, beat to blend the ingredients, scraping down the paddle and the sides of the bowl as needed. The dough may look curdled – that’s all right. With the machine still on low, add the flour in three or four additions and mix only until the mixture comes together to form a soft, moist dough – a matter of seconds. Don’t overdo it.
to shape and chill
No matter the method you used to make the dough, gather it into a ball and divide it into three or four pieces: three pieces for 10 1/4-inch tarts, four for 8 3/4-inch tarts (of course you can press the dough into one large disk and wrap each one in plastic. Allow the dough to rest in the refrigerator for at least 4 hours or for up to 2 days before rolling and baking. At this stage, the dough can be wrapped airtight and frozen for up to a month).
to roll
For each tart, place a buttered tart ring on a parchment-lined baking sheet and keep close at hand. Work with one piece of dough at a time; keep the remaining dough in the fridge.
Working on a lightly floured surface, roll the dough into a round between 1/16 and 1/8 inch thick, lifting the dough often and making certain that the work surface and the dough are amply floured at all times (because this dough is so rich, it can be difficult to roll, but a well-floured surface makes the job easier). Roll the dough up and around your rolling pin and unroll it onto the tart ring. Fit the dough into the bottom and up the sides of the ring, then run your rolling pin across the top of the ring to cut off the excess. If the dough cracks or splits as you work, don’t worry – patch the cracks with scraps and just make certain not to stretch the dough that’s in the pan (what you stretch now will shrink later). Prick the dough all over with the tines of a fork (unless the tart will be filled with a runny custard or other loose filling) and chill it for at least 30 minutes in the fridge or freezer.
to bake
When you are ready to bake the crust(s), preheat the oven to 350 degrees F. Fit a circle of parchment paper or foil into each crust (cut the paper large enough to extend above the top of the tart) and fill with dried beans or rice. To partially bake the crust, bake for 18-20 minutes, or until lightly colored. If the crust needs to be fully baked, remove the parchment and beans and bake for another 5-7 minutes, until golden. Transfer the crust to a rack to cool.
Lemon cream
1 cup sugar
zest of 3 lemons
4 large eggs
3/4 cup freshly squeezed lemon juice
10 1/2 ounces unsalted butter, cut into tablespoon-sized pieces, softened
Put a saucepan of water over heat and bring the water to the simmer. Place the sugar and lemon zest in a large metal bowl that can be fitted into the pan of simmering water. Off the heat, rub the sugar and zest together between your fingers until the sugar is moist, grainy and very aromatic. Whisk in the eggs and then the lemon juice.
Fit the bowl into the pan of simmering water (making certain that the water doesn’t touch the bottom of the bowl). Cook, stirring with the whisk, until the cream thickens and reaches 180 degrees F, as measured on an instant-read thermometer. As you cook the cream, whisking all the while to keep the eggs from overheating and scrambling, you’ll see that at first the cream is light and foamy, then the bubbles get larger, and finally, as the cream starts to thicken, the whisk leaves tracks. Pay particular attention at this point – the tracks mean the cream is almost ready. Keep whisking, keep checking the temperature, and keep your patience – depending on how much water you’ve got simmering beneath the bowl, it could take as long as 10 minutes for the cream to reach 180 degrees F.
Pull the cream from the heat as soon as it is cooked and strain it into the container of a blender or food processor, or into a clean bowl large enough in which to beat it with an immersion blender. Let the cream rest at room temperature, stirring occasionally, until it cools to 140 degrees F, about 10 minutes.
Working with the blender on high speed, or using a food processor or immersion blender, beat the cream while adding the pieces of butter, about five at a time. Scrape down the sides of the container or bowl as needed. When all the butter has been incorporated, continue beating the cream for another 3 to 4 minutes – extra insurance for a light and perfectly smooth lemon cream.
Apricot and honey frozen cones
Makes 10
825g tin apricots, drained
1 cup sugar
1/3 cup water
2 cups plain greek-style yoghurt
3/4 cup honey
1 teaspoon vanilla extract
1/2 cup créme fraiche or light sour cream
Place the apricots, sugar and water in a medium sauce pan over low heat. Stir until the sugar dissolves. Bring to the boil, reduce the heat and simmer for 3-4 minutes. Set aside to cool.
Place the yoghurt, honey, vanilla and créme fraiche in a bowl and stir to combine. Set aside.
To make the cones, cut out 10 × 15 × 30cm lengths of baking paper. Twist the baking paper to form a cone shape making sure there is no hole at the pointy end and staple to secure. Spoon 1 tablespoon of the apricot mixture into each cone. Top with 1/4 of the yoghurt mixture. Place upright in the freezer for 2 hours or until set. To serve, invert the cones on to a serving plate and peel off the baking paper.
Food - Sweet 29 comments Permalink
Commenting is closed for this article.
browse

search
categories
- About (1)
- Books (5)
- Food - Savoury (21)
- Food - Sweet (79)
- Misc (27)
- Places (34)
- Seasons (4)
current reading
 The Modern Pantry
 Everyday Asian
 Full of Flavour
 Short and Sweet
 The Art of French Baking
 Jeni's Splendid Ice Creams at Home
 Super Natural Every Day
 Comfort & Spice
 Scandilicious
 Bocca
Bocca Vegetarian
 Beyond Nose to Tail
 Weekend Baking
food blogs
- 101 Cookbooks
- A La Cuisine!
- à la mode
- Anissa Helou
- Becks & Posh
- Breakaway Cook
- Cafe Fernando
- Cannelle et Vanille
- Chez Pim
- Chubby Hubby
- Coco & Me
- Cook & Eat
- Cook Sister!
- Cravings
- Dan Lepard
- David Lebovitz
- Delicious Days
- Dessert First
- Dorie Greenspan
- Eat like a girl
- Eggbeater
- Food Beam
- Food52
- Forty-sixth at Grace
- Fuchsia Dunlop
- Gluten Free Girl
- Il Cavoletto di Bruxelles
- In Praise of Sardines
- Kitchen M
- Kuidaore
- La Tartine Gourmande
- Lemonpi
- Lovescool
- Lucy's Kitchen Notebook
- Man That Cooks
- Matt Bites
- Michael Booth
- My Kugelhopf
- Oh Joy Eats
- Oishii Eats
- Orangette
- Ottolenghi
- Pukka Living
- Pure Blog
- Running with Tweezers
- Scandilicious
- Seven Spoons
- She Who Eats
- Simply Recipes
- Sunday Suppers
- Sweet Paul
- Tartelette
- The Traveler's Lunchbox
- The Wednesday Chef
- To Short Term Memories
- Use Real Butter
- Wanderlust
- What Katie Ate
- White on Rice Couple
- Winosandfoodies
- Wrightfood
Nordljus is powered by textpattern
All writing and images on this site © 2005-2009 Keiko Oikawa
Wow oh wow! First that lovely Lemon tart and then those cute little apricot cones! Great entry! Love it. You pics are superb!
Posted by chronicler | 25 April 2005 #As always Keiko, your recipes sound so good and the pictures are stunning, both the tart and the little cones - how cute are they?! I love your cake stand thingy - I’ve been looking for something like that, I recently got one from my Mom, but it’s got a white base and I love the fragile look of your glass one. You wouldn’t be able to buy it of the internet, would you?
Posted by Zarah Maria | 25 April 2005 #pretty! it’s so very donna hay. i wanted to make a frozen dessert for imbb, but i don’t have any room in my freezer :-( i’ll have to clear it out in time for summer.
Posted by santos. | 25 April 2005 #
Posted by Sara | 25 April 2005 #I just recently discovered your blog and am so impressed with your photos and baking expertise! are you a chef or do you just like to bake in your free time? You definitely have a knack for both baking and photography! I look forward to reading more!
An awesome idea with the cones, they look so fun and refreshing! Perfect for the summer days ahead. Due to our microscopic freezer, we bought an extra freezer on ebay ... and I know what impressive dessert I’m making to christen it. Thanks for the beautiful post.
Posted by Mia | 25 April 2005 #Hmmm, everything here sounds so yummie. I like the look of those cones - a party stopper!
Posted by Dreska | 25 April 2005 #As always, this is a mouthwateringly tantalizing looking dessert... especially now that our weather has warmed up some.
I will be whipping up a few different flavors of those cones for a dinner party this summer - I think they’ll be a perfect light dessert - maybe 4 or 5 per plate, each a different flavor. Could be fun, no?
Posted by Fatemeh | 25 April 2005 #Excellent photos - love your blog - especially the orange and lemon tart - mmmmmmmmmmm.
Posted by Alison McQuade | 26 April 2005 #How delicious! Lemon tart is one of the most perfect things ever created, in my opinion, and your apricot cones are simply beautiful. You really have a flair for picking interesting recipes, and I love the imagination you put into plating and photography... thanks again for the great inspiration!
Posted by Melissa | 26 April 2005 #As always, your blog continues to amaze me. I love your photos and your culinary skills are outstanding. Your tart looks so sophisticated and the apricot cones are so cute!
Posted by Tea | 26 April 2005 #Great effort. Love the cones.
Posted by Barbara | 26 April 2005 #Keiko, great looking lemon+orange tart! It looks like the exact replica of Heremè’s one. And, oh yes, add me to the list of the apricot cones fans: they’re absolutely smashing.
Posted by Alberto | 26 April 2005 #Keiko, thank you so much for sharing the recipes, especially for Herme’s sweet tart dough! I’ve heard that it’s wonderful and I can’t wait to try it. I was curious about the lemon curd filling--what is the texture like? It looks quite soft and creamy, almost like pudding. Or is it actually fairly firm when you slice the tart up?
Posted by Rachel | 26 April 2005 #Hey there! Both your orange & lemon tart and your frozen dessert look fabulous! We’ll be having dear friends from abroad over in short time, and have been pondering over what the menu will be like. The decision on the dessert has just been made :))
Posted by Oliver | 26 April 2005 #Darn it! I totally spaced out on IMBB again although I’m glad you didn’t! Always amazing Keiko, and this time I’m drawn to the serving pieces that you use. Perhaps you could give a little info next time? I’ve been crazy about collecting dessert plates but only in sets of 2. That glass cake stand looks beautiful and only reminds me that I have yet to purchase one.
Posted by rowena | 27 April 2005 #You know, those frozen horns looked funny to me. I don’t know why. Am I imaging some ’devilish’ deed? Hahaha.
Posted by celiaK | 27 April 2005 #I have to give that one a go. You’re right it will be fun to make them with kids. Thanks for sharing. And oh btw, as usual, your pics are to die for. :)
Oh gosh, keiko, what stunning pictures. You really should publish your own cookbook. :)
Posted by Julia | 27 April 2005 #Hi Chronicler - thank you!
Hi Zarah - thanks, I bought the cake stand thingy in Paris, but you should be able to find one on the internet, or an even better one in Copenhagen... (I have so many favourite shops there!) I’ve actually been looking for a ceramic one like your mum’s, I think they look warm and more inviting.
Hi Santos - yes, it’s so her. Hope you’ll have more room in your freezer before summer!
Hi Sara - thank you for your kind words, no I’m not a professional in any sense, I find cooking and taking pictures therapeutic though...
Hi Mia - thank you, I hope you’ll enjoy making them!
Hi Dreska - I actually had to think how to eat it :)
Hi Fatemeh - thanks, and I think your idea is brilliant! You can think of so many different flavours/colours, can’t you? I look forward to seeing them.
Hi Alison - thank you, I hope you’ll enjoy making the tart!
Hi Melissa - thanks, to be honest I wasn’t mad about tarts before, but I really liked this one.
Hi Tea - thank you for your kind words, I hope you’ll enjoy making them too.
Hi Barbara - thanks, actually this time wasn’t too hard, making tarts is straightforward anyway and the cones are really quick to make!
Hi Alberto - thank you, I’m hoping I can try more of his recipes from the book (but I have to say that I prefer his chocolate desserts book...). I’m looking forward to seeing your beautiful desserts too.
Hi Rachel - do try making the dough sometime, the curd is quite soft when you are making it, but because it has a lot of butter in it, it gets much firmer when it’s chilled. Yum!
Hi Oliver - thanks, I hope you’ll have a wonderful time with your friends.
Hi Rowena - I have to say that I don’t use that glass cake stand very often (it’s got quite a tall lid with it, so it doesn’t fit in the fridge!), but I like looking at tableware like you. I can’t afford most of the things I like, so I only buy them when they are on sale!
Hi Celia - I was thinking the same thing! They look cute in a way, but I thought it looked quite funny as well!
Hi Julia - thank you for your compliment, but I need to learn loads more stuff!
Posted by keiko | 28 April 2005 #I dearly regret not visiting Pierre Herme in Paris a while back, that tart looks and sounds amazing.
Beautiful photographs too! Lovely blog :-)
Posted by Ai-Ling | 28 April 2005 #Hi Ai-Ling - thank you for visitng, I hope you can go back to Paris soon... I’m planning a short trip to Paris and I’m sure I’ll be buying loads of stuff at his shop (actually not *loads*, because I can’t afford!) I’m quite upset that you can’t buy decent cakes here in the UK.
Posted by keiko | 28 April 2005 #Nordljus, trevlig sida, pratar du svenska?
Posted by ylva | 1 May 2005 #Hi Ylva - thank you for visiting, no I don’t speak any Swedish at all... I just love Scandinavia (would love to visit again soon) and wanted my blog to have a connection!
Posted by keiko | 7 May 2005 #I love those cones! Wow! Awesome! How do you make them?
Posted by Judy Pokras | 9 May 2005 #Hi Judy - thanks for your comment. I’ve put the recipe up, I hope you enjoy making them too!
Posted by keiko | 13 May 2005 #I am looking for a Swedish dessert recipe that involves a waffle-type cone with poppy seeds and a creme filling - possibly maple-flavored. Please email me at srlanford@hotmail.com if you have this recipe!
Posted by Susan L. | 13 May 2005 #Nice shot, I like the slightly out of focus plates in the background, they really add to the composition.
Posted by Smoove D | 14 May 2005 #Hi Susan - sorry for the late reply. I’m afraid I don’t have the recipe, it sounds heavenly though! Maybe you can ask Dagmar of A Cat in the Kitchen, she is Swedish and a great cook! (you can find the link to her site in my favourite food blogs)
Hi Smoove D - I really appreciate your kind comments!
Posted by keiko | 22 May 2005 #Hi,
I have just found your blog and it is so impressive! I always find it nicer to read recipes when there is a beautiful picture to give u inspiration!
I would very much like to make the apricot cones over Christmas (a nice break from all of the rich food) and I just wanted to clarify..do u liquidise the apricots after cooking or just leave them whole?
Posted by Jessica | 18 December 2007 #Hi Jessica – thank you for your kind note and I’m sorry I didn’t get back to you sooner. I actually used canned apricots for this, pureed in a food processor. You can use fresh ones of course but you still need to puree them after cooking.
Posted by keiko | 21 January 2008 #